2009-05-29

Header Background

If you want to have a separate paper behind your header so that it appears to span the whole page you need to add this in the Html code.

On my original blog design I chose to have the same paper as the bottom layer of my header so it appears to be all one piece. But the header actually floats above it. (I have changed the header background paper so you can see the difference.)

The header itself is just uploaded via Blogger


Here is the whole of the header Html code on my blog=

/* Header
-----------------------------------------------
*/

#header-wrapper {
padding:0 2% 0px;
background: url(https://blogger.googleusercontent.com/img/b/R29vZ2xl/AVvXsEizYE75vS1Zkf1nJZ6O5QXKI0S5co2DAnp-nN9OeWe24tWcXzt_NysvexFcLJZQ5JbamlFx318dbt-YDHKSCtOgV5eWowWQGjvHjbsX4vn6mxtcby3XaOKTj1zA5EJH8g9JDHrAA20sPO6N/s660/KPertiet_KraftyElegance-7.jpg);
}

#header {
margin: 5px;
border: 1px solid $bordercolor;
text-align: center;
color:$pagetitlecolor;
}

#header-inner {
background-position: center;
margin-$startSide: auto;
margin-$endSide: auto;
}

#header h1 {
margin:5px 5px 0;
padding:15px 20px .25em;
line-height:1.2em;
text-transform:uppercase;
letter-spacing:.2em;
font: $pagetitlefont;
}

#header a {
color:$pagetitlecolor;
text-decoration:none;
}

#header a:hover {
color:$pagetitlecolor;
}

#header .description {
margin:0 5px 5px;
padding:0 20px 15px;
text-transform:uppercase;
letter-spacing:.2em;
line-height: 1.4em;
font: $descriptionfont;
color: $descriptioncolor;
}

#header img {
margin-$startSide: auto;
margin-$endSide: auto;
}
2009-05-26

Background Image

To begin with... I've used a very handy ebook that was my guide for designing my blog. I've found the instructions to be quite straight-forward and if I follow them, I get the results I'm looking for. (At this very minute the site is down... so I hope that doesn't mean that it is gone forever!)

What I did was load the *paper* I wanted as a gadget (choose photo) at the bottom of my test blog. If you look carefully you can see it below the other two other papers.

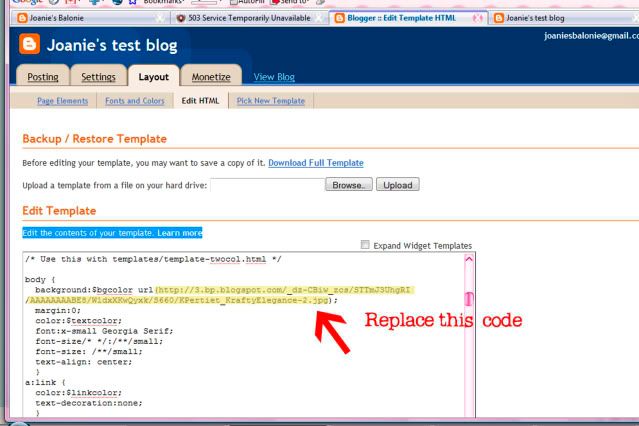
Then you right click the paper you want to use as the background, choose properties and then copy that code... (example- http://2.bp.blogspot.com/_dz-CBiw_zcs/STWesGNa5RI/AAAAAAAABFU/BmU01Z0Y430/S660/KPertiet_KraftyElegance-7.jpg)

background Html code


Navigate to the layout tab, sub-tab Edit Html in Blogger.
** Blogger suggests that you backup your blog template before you proceed... good idea.
Scroll down until you find the background: Html code. Paste/replace the new code inside the parenthesis. Then click the preview button. You should see your paper as the blog background.

I noticed when I replaced my background that if you have a very directional or noticeable print you will see tiling in the background. This particular paper is busy enough that you don't notice that.

Hope this helps...

2009-05-25

How to Get Large Photos on Blog

First you'll need to open an account at PhotoBucket. I'm sure Flickr and other online photo places also have the ability to do this, but I am most comfortable with PhotoBucket.

Create an album... I have several different ones.

Locate the Upload Images area shown below.
Choose the size you want BEFORE you click the choose files button...

Photobucket html

Note that you can upload multiple files by holding down the ctrl key (I am embarrassed to say that I just saw this after I've been using this for 6+ months... not very observant, huh?)

After your files have uploaded it will take you to a page where you can give your photos a title, description and tags. I found that if I tab between these fields it will save the entry, but when I didn't do that it didn't save. Then return to your album (button at the bottom of the page)

Now you will be back at the screen pictured above again. Locate the HTML code, highlight and copy it. Then paste that code into your Edit Html tab in Blogger.

The size demonstrated here is 640 x 480. You can go larger or smaller. Heather uses a larger size on her photo and personal blogs and it is amazing!! She is the one that turned me on to this bigger-is-better- photo!! I love it.

2008-09-07

How to make my design?

The whole purpose of this blog is to have somewhere to test out my designs so if there is a mess up I don't lose my "real" blog!